Testing SKAMPI
This page is outdated, refer to the System Team for support.
The SKA MPI codebase ultimately holds all the information required to deploy and configure the complete prototype. This information is encapsulated as a collection of Helm charts, Makefiles and any other scripts, components to support its test and deployment.
This page outlines the various categories of testing and approaches one can employ to test various aspects of SKA MPI prototype that can be implemented in this repository.
Minikube Testing Environment - EngageSKA Openstack
Minikube is a tool that makes it easy to run Kubernetes locally. Minikube runs a single-node Kubernetes cluster inside a Virtual Machine (VM) in Openstack.
Create a Virtual Machine
The first step is to create a Virtual Machine in EngageSKA Openstack: https://developerskatelescopeorg.readthedocs.io/en/latest/services/ait_performance_env.html. The recommended specifications are:
- Volume Size: 100 GB
- Image: Ubuntu 18.04 LTS Jan/2020
- Flavor: m2.small
Don’t forget to associate your public key or generate a new key pair in the Key Pair section.
Next, go to the Instances section and create a new floating IP (dropdown on the right).
Create and test the environment
Install ansible inside the VM and run the ansible-playbooks for creating a development environment and the SHAMPI environment:
# Install Ansible
sudo apt-add-repository --yes --update ppa:ansible/ansible && sudo apt-get install ansible
# Create Environment
git clone https://gitlab.com/ska-telescope/ansible-playbooks.git
cd ansible-playbooks
ansible-playbook -i hosts deploy_tangoenv.yml
ansible-playbook -i hosts deploy_skampi.yml
Verify if everything is running using kubectl get services -n integration:
NAME                               TYPE        CLUSTER-IP       EXTERNAL-IP   PORT(S)                             AGE
archiverdb-archiver-test           NodePort    10.96.233.41     <none>        3306:31305/TCP                      5m27s
databaseds-tango-base-test         NodePort    10.105.145.228   <none>        10000:30897/TCP                     5m24s
elastic-logging-test               NodePort    10.103.79.41     <none>        9200:31976/TCP                      5m26s
etcd-restore-operator              ClusterIP   10.100.7.96      <none>        19999/TCP                           5m28s
jupyter-oet-test                   NodePort    10.105.61.127    <none>        8888:32025/TCP                      5m26s
kibana-logging-integration-test    ClusterIP   10.102.79.54     <none>        5601/TCP                            5m26s
mongodb-webjive-test               ClusterIP   None             <none>        27017/TCP                           5m23s
rest-oet-test                      ClusterIP   None             <none>        5000/TCP                            5m25s
ssh-oet-test                       NodePort    10.97.46.250     <none>        22:30520/TCP                        5m25s
tango-rest-tango-base-test         NodePort    10.99.6.220      <none>        8080:32490/TCP                      5m24s
tangodb-tango-base-test            NodePort    10.103.4.193     <none>        3306:31154/TCP                      5m24s
test-sdp-prototype-etcd            ClusterIP   None             <none>        2379/TCP,2380/TCP                   3m18s
test-sdp-prototype-etcd-client     ClusterIP   10.107.155.120   <none>        2379/TCP                            3m18s
test-sdp-prototype-etcd-nodeport   NodePort    10.107.127.158   <none>        2379:30456/TCP                      5m25s
vnc-tango-base-test                NodePort    10.108.131.141   <none>        5920:30658/TCP,6081:30662/TCP       5m24s
vscode-tango-base-test             NodePort    10.107.133.184   <none>        22:31214/TCP                        5m24s
webjive-webjive-test               ClusterIP   10.111.102.81    <none>        80/TCP,5004/TCP,3012/TCP,8080/TCP   5m23s
The next step is to reboot the system with sudo reboot and then ssh again into the VM.
Finally, download the SKAMPI repository and run the test in minikube:
#Remove the existing skampi directory
sudo rm -rd skampi/
# Download and run test
git clone https://gitlab.com/ska-telescope/skampi.git
cd ansible-playbooks
ansible-playbook deploy_minikube.yml
cd ..
cd skampi/
make deploy_all KUBE_NAMESPACE=integration
Kubernetes Testing Environments
At the moment 3 k8s multi-node clusters are available for testing purpose:
| Cluster name | Information |
|---|---|
| engageska-k8s-master |
|
| engageska-k8s-v2 |
192.168.93.46 gangway.kubernetes-v2.engageska-portugal.pt
|
| kubernetes-cipro |
192.168.93.46 gangway.kubernetes-cipro.engageska-portugal.pt
|
Kubectl setup
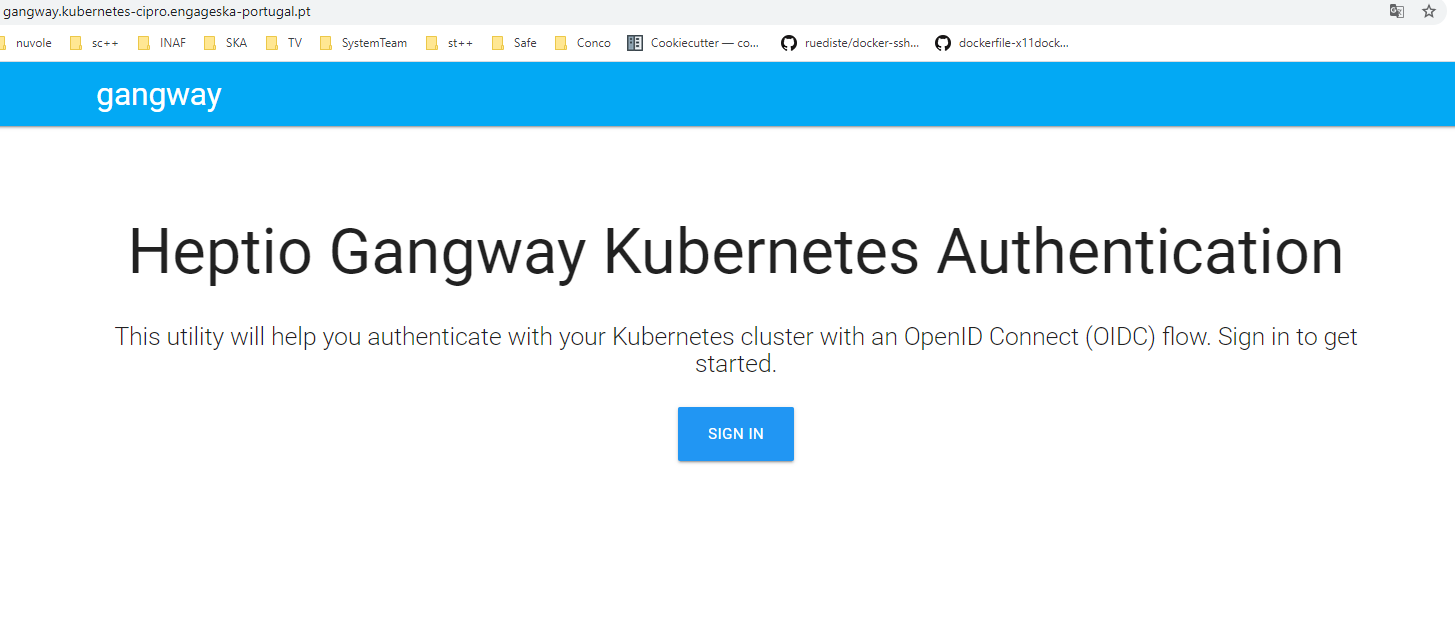
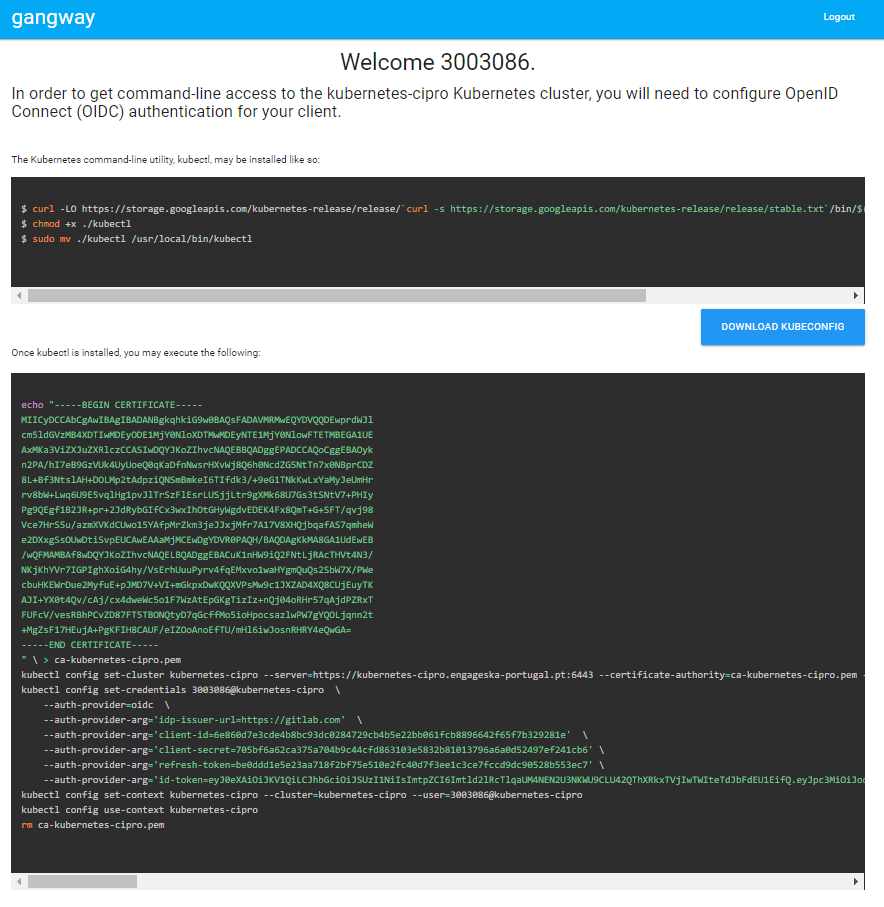
If a cluster has the A&A module enabled it is possible to generate the instructions to let the local kubectl work with it. In order To do that, once modified the file /etc/hosts as explained above, open the [gangway](https://github.com/heptiolabs/gangway) url for engageska-k8s-v2 or `kubernetes-cipro <http://gangway.kubernetes-cipro.engageska-portugal.pt >`_. The Sign In button will redirect to gitlab.com for authentication. Once authenticated it will appear the set of commands to setup the local kubectl as shown below.
The following namespaces are available for use: “integration”, “sdp”, “csp”, “button”, “ncra”, “karoo”. For creating new namespaces or for any authorization request, contact the system team.
Visual Studio Code Remote Access
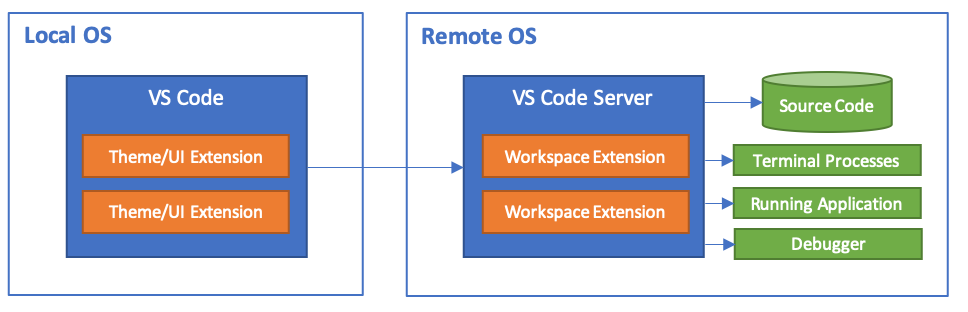
Visual Studio Code Remote Development allows you to use a container, remote machine, or the Windows Subsystem for Linux (WSL) as a full-featured development environment.
No source code needs to be on your local machine. Each extension in the Remote Development extension pack can run commands and other extensions directly inside a container, in WSL, or on a remote machine so that everything feels like it does when you run locally.
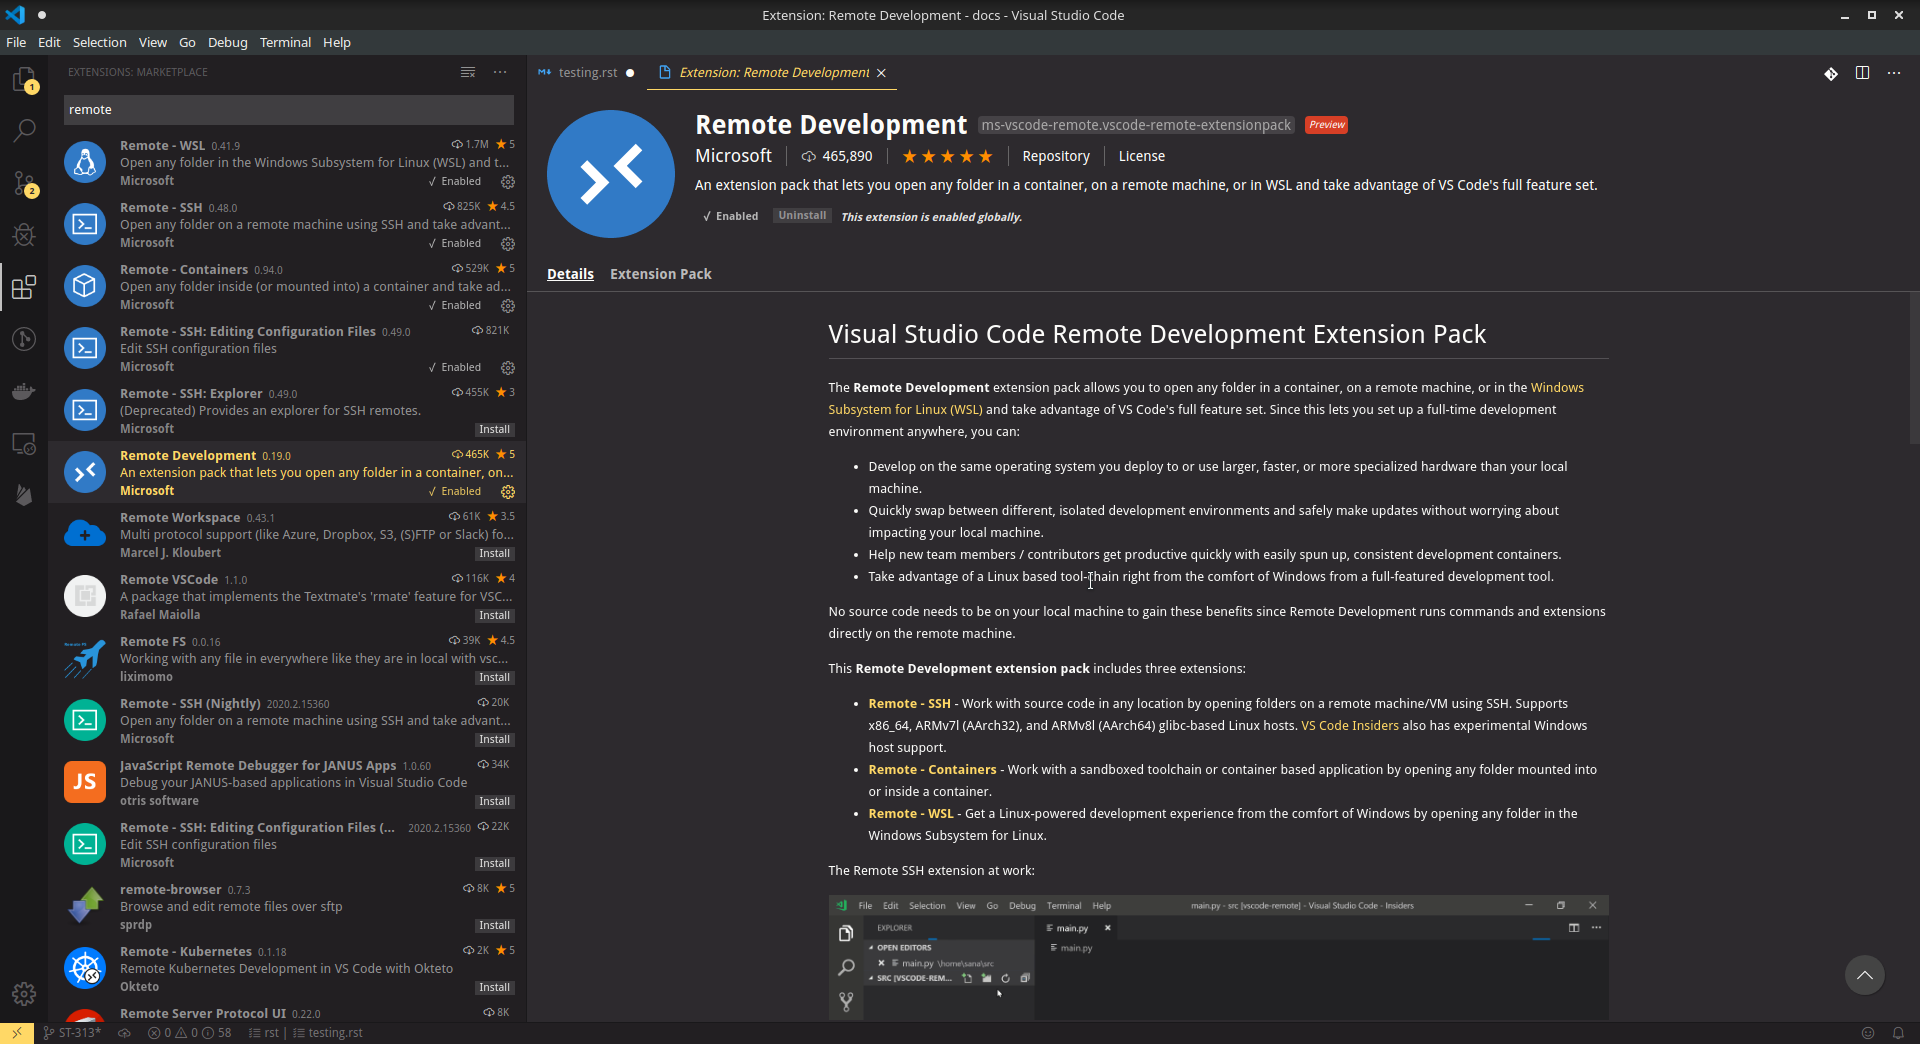
Install Extension
Before everything, we need to install the Remote Development extension from vscode.
Create SSH connection
On vscode, open the Remote-SSH: Open Configuration File..., copy and paste these properties:
Host connection-name         # connection-name -> name of your connection, give any name you want
    HostName IP              # IP -> VM's floating IP
    User ubuntu
Finally, with the command ssh connection-name starts the ssh connection.
Connect to Openstack VM - Option 1
After you created a new ssh connection on your local machine: Create SSH connection.
After this, launch the remote extension inside vscode (bottom left icon or use the shortcut ctrl+shift+P)
and select Remote-SSH: Connect to Host... and select the connection-name you previously created.
Connect to Kubernetes - Option 2
The tango-base chart available in the skampi repository defines an ssh service which can be used within the vscode extension. The service is deployed in the same IP as the host machine and the port can be discovered with the command kubectl get services -n integration which will give you the following output:
kubectl get services -n integration
NAME                               TYPE        CLUSTER-IP       EXTERNAL-IP   PORT(S)                             AGE
...
vscode-tango-base-test             NodePort    10.107.133.184   <none>        22:*PORT*/TCP                        5m24s
...
Create new ssh connection on your local machine: Create SSH connection. But with this configuration parameters:
Host connection-name          # connection_name -> name of your connection, give any name you want
    HostName IP               # IP -> VM's floating IP
    Port port                 # port-> vscode server port
    User tango
After this, launch the remote extension inside vscode (bottom left icon or use the shortcut ctrl+shift+P)
and select Remote-SSH: Connect to Host... and select the connection-name you previously created.
Please request the password to the system team.
Testing Infrastructure as Code
There is a substantial amount of infrastructure and its constituent parts (e.g. Kubernetes resources and their configuration) that forms part of The Telescope. This configuration is orthogonal to the functionality of the software components that are deployed, but changes to them can result in faults in deployment and operation of the system.
Testing at the appropriate level will ensure faster feedback of changes, reducing frustration for everyone and ultimately improve the quality of the system. Troubleshooting faults in a distributed system caused by a typo in configuration is no fun!
To support different levels of testing, various different jobs are executed as part of the SKAMPI build pipeline and some testware has been developed to aid in testing.
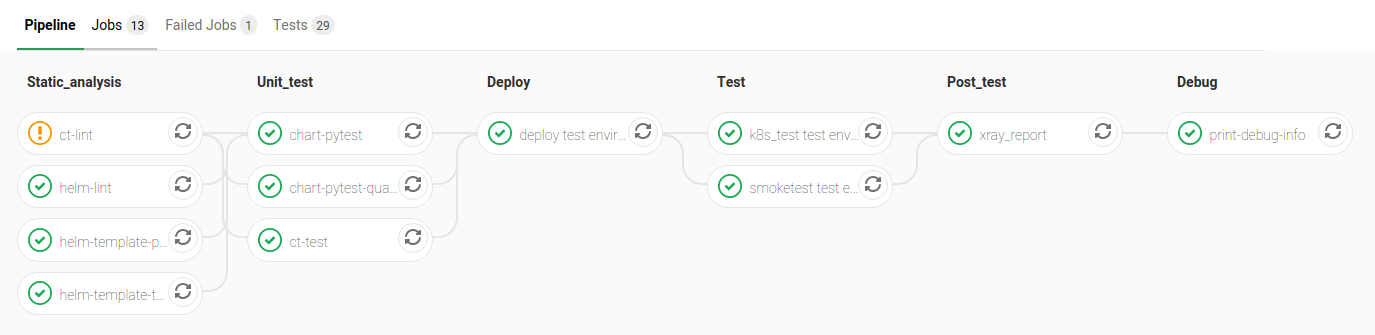
Pipeline Stages for Testing
The stages of the pipeline related to testing are outlined below:
| Stage | Description |
|---|---|
| Static_analysis | Tests aspects of charts that do not require their deployment, e.g. linting |
| Unit_test [unit] | Tests here might deploy them to an ephemeral test environment. |
| Test | Tests to be executed in-cluster alongside the fully deployed SKAMPI prototype. |
SKAMPI Gitlab CI Pipeline (as of January 2020):
Python testware
Some components have been developed to assist in testing the Helm charts using Python. They are intended to be used with pytest as a test runner and there are currently three jobs in the pipeline that are configured to executed them, filtered based on pytest markers:
Pipeline jobs
- helm-template-pytest runs as part of the Static_analysis stage in the pipeline executes Python tests marked
with
no_deploy. - chart-pytest runs as part of the Unit_test stage and will execute tests marked with the
chart_deploymarker [unit]. - chart-pytest-quarantine also runs during the Unit_test stage and executes tests marked with
quarantinebut do not fail the build if they do.
Pytest configuration
As per convention, Pytest is will collect all tests placed in the /tests/ directory. The following markers are
currently defined (see /pytest.ini for more details):
no_deploy- Indicates tests that will not require any resources to be deployed into a cluster. Generally, tests that parse and transform the source chart templates.
chart_deploy- Indicates tests that requires resources to be deployed into cluster such as the Helm chart under test and any other collaborating testware.
quarantine- Indicates tests that should be executed but not necessarily break the build. Should be used sparingly.
The following custom command-line flags can be passed to Pytest:
--test-namespace <namespace>- Specify the namespace to use in the test session. Defaults to
ci. --use-tiller-plugin- Indicates that all commands to Helm should be prefixed with
helm tiller run --. Required when using the helm-tiller plugin.
Test lifecycle
The lifecycle (setup, execute, teardown) of tests are managed by pytest fixtures, defined in /tests/conftest.py.
The infratest_context fixture in particular will determine if tests that involve deployments are included in the
pytest run, i.e. the chart_deploy marker is included. It will then:
- invoke kubectl to create a namespace for the test resources(pods, services, etc.) to be deployed into
- ensure this namespace is deleted after the test run
Note: the default namespace is ci, but can be overriden by specifying the custom pytest option,
--test-namespace. When running inside the pipeline, this flag is set to ci-$CI_JOB_ID so each job will use
its own namespace and resources, ensuring test isolation.
Test support
A collection of useful components and functions to assist in testing can be found in the tests.testsupport module
(/tests/testsupport/):
testsupport.util- Functions that may be useful in testing such as wait_until which allows polling, retries and timeouts.
testsupport.helm.HelmChart- Represents a Helm chart that is the collection of YAML template files and not necessarily a set of deployed
Kubernetes resources. Primarily used to assist in testing the policies in YAML specifications, i.e.
no_deploytests. testsupport.helm.ChartDeployment- Represents a deployed Helm chart and offers access to its resources in-cluster their metadata (by querying the Kubernetes API server).
testsupport.helm.HelmTestAdaptor- A rudimentary adaptor class to manage the interaction with the Helm CLI.
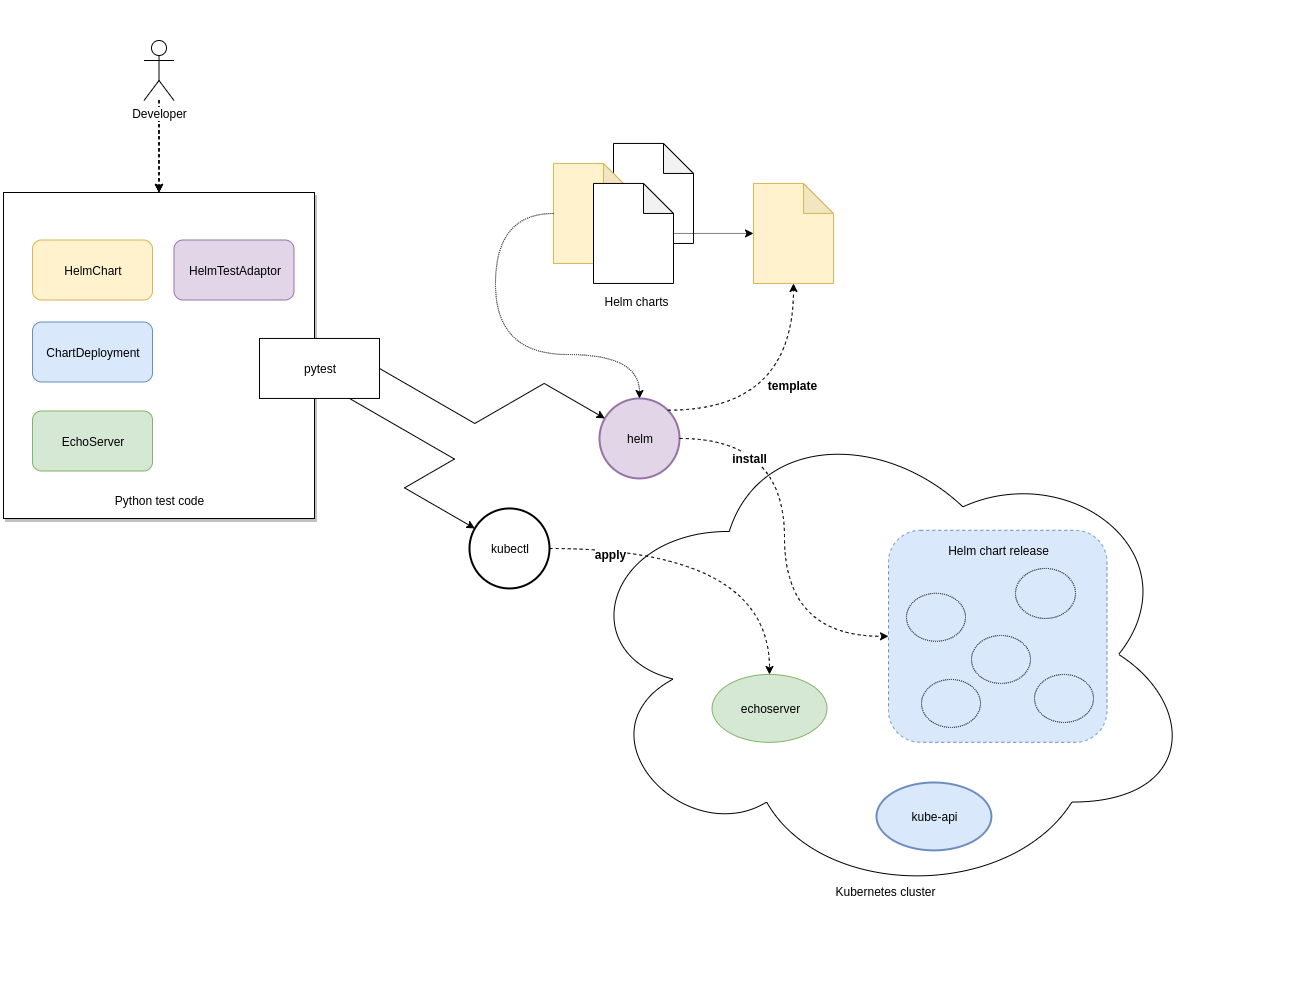
testsupport.extras.EchoServer- Represents a pod that can be deployed alongside the chart under test, containing a basic Python HTTP server that can receive commands. Currently it only supports echoing any HTTP POST sent to the /echo path. A handle to this is provided by the print_to_stdout method.
Charts are deployed via Helm and the HelmTestAdaptor. It’s available as a Pytest fixture or you can import it from
the tests.testsupport.helm module.
The ChartDeployment class is an abstraction to represent a deployed chart and offers access to its resources
in-cluster (by querying the Kubernetes API) and metadata (such as release_name).
In fact, instantiating a ChartDeployment in code will deploy the specified chart. A useful pattern is to create
Pytest fixture that represents the chart to be deployed and yields a ChartDeployment object. It can also call
.delete() to ensure the chart is deleted and Pytest fixture scope can be used to limit a chart’s lifespan. For an
example of this see the tango_base_release fixture in /tests/tango_base_chart_test.py.
The diagram below illustrates the relationship between the Python classes in test code, CLI tools and the cluster.
Running locally
Requirements:
- A Kubernetes cluster (minikube).
- kubectl authorized to create namespaces and deploy resources to the cluster.
- helm v3.0.2
- Python 3.7+
- Install Python dependencies:
pip install -r test-requirements.txt - Execute only the
no_deploytests:pytest -m "no_deploy and not quarantine" - Execute only the
chart_deploytests:pytest -m "chart_deploy and not quarantine" - Execute the quarantined tests:
pytest -m quarantine
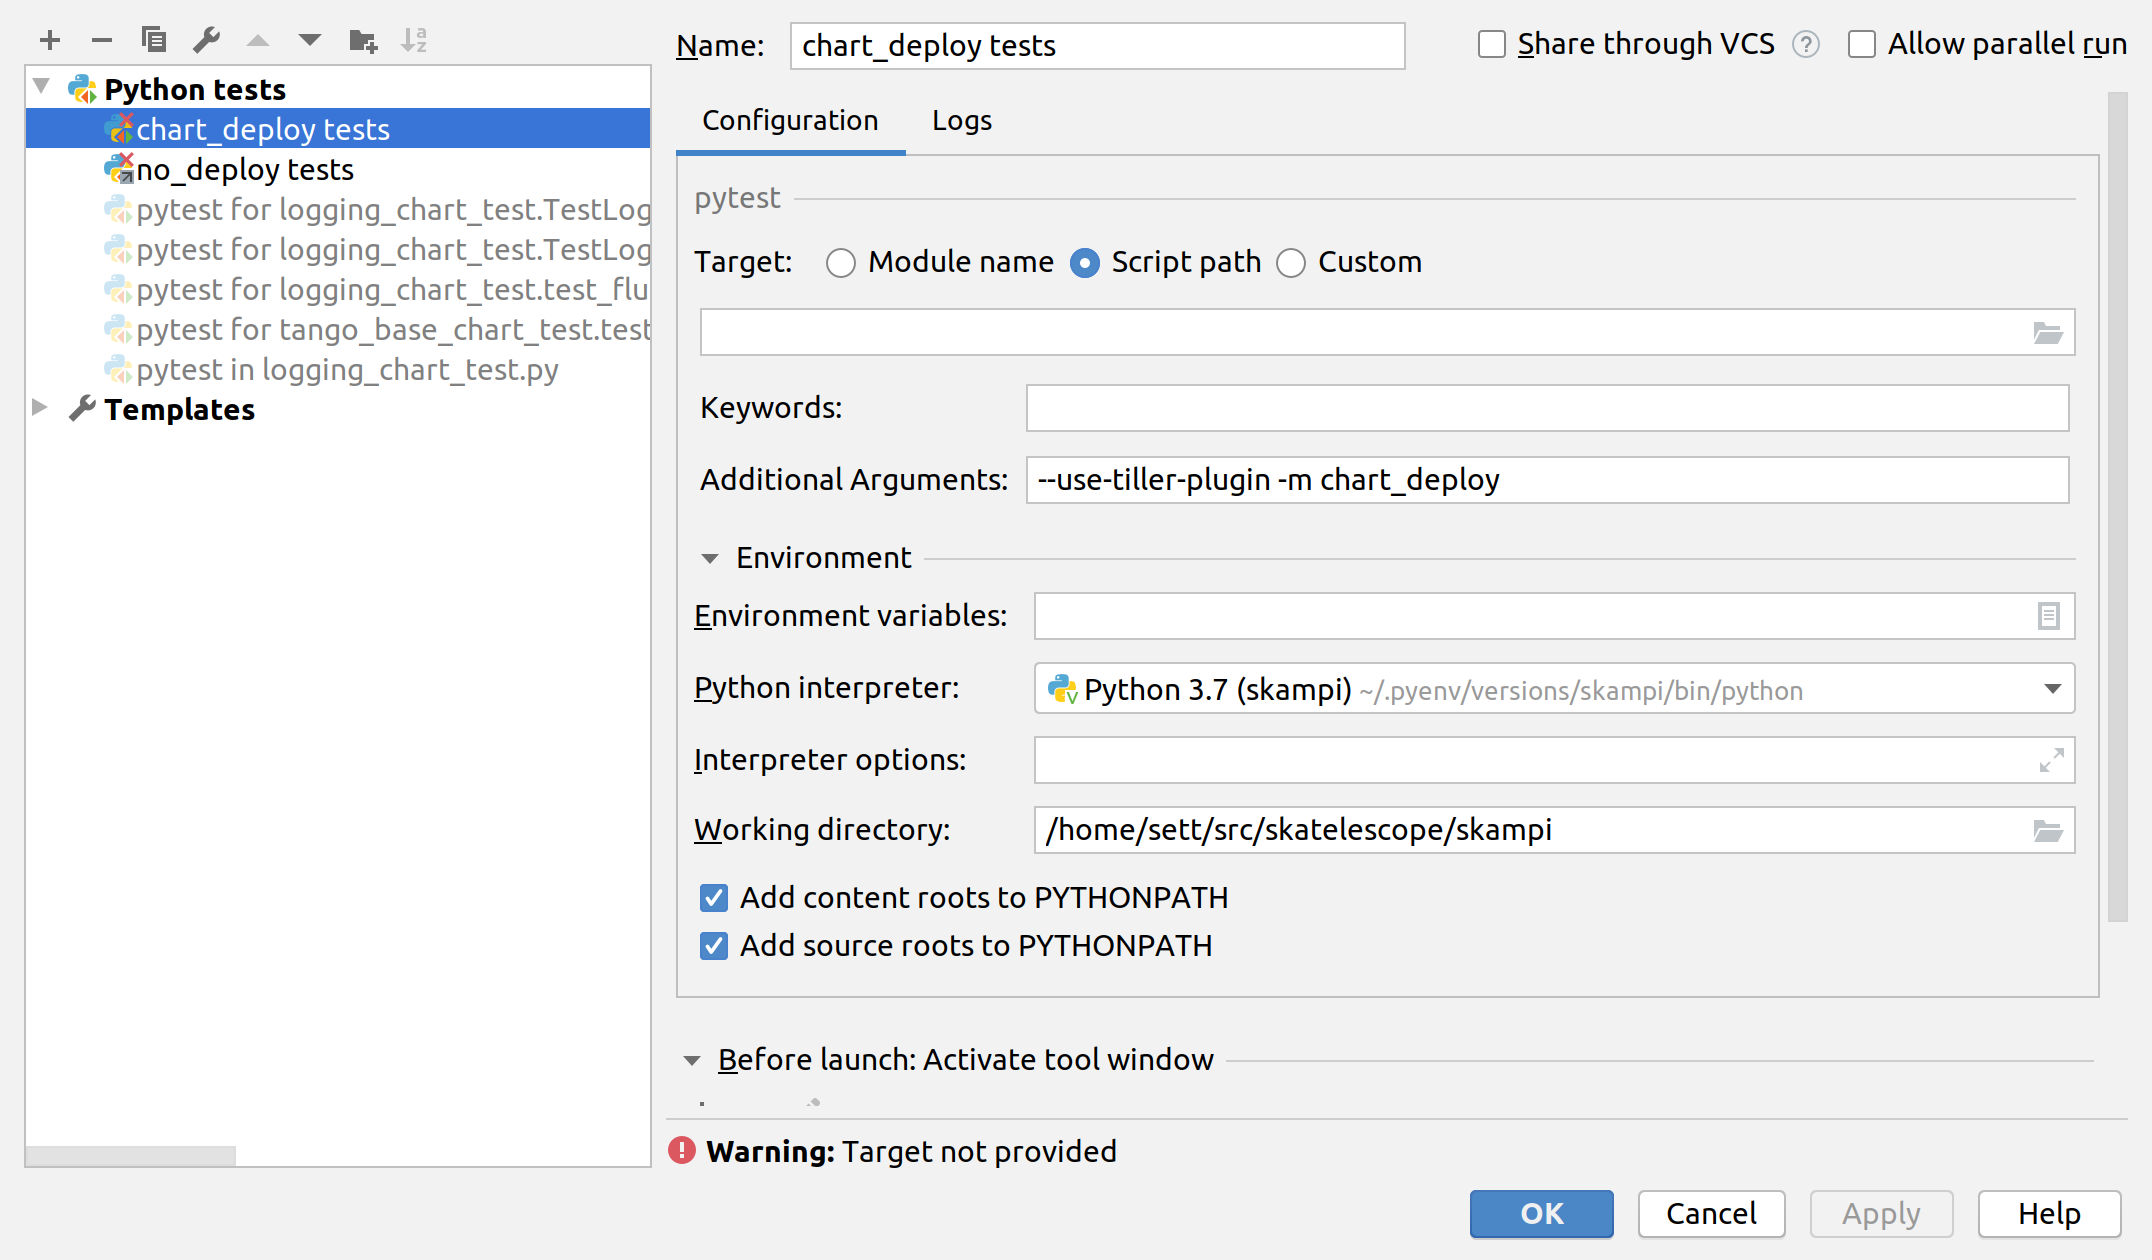
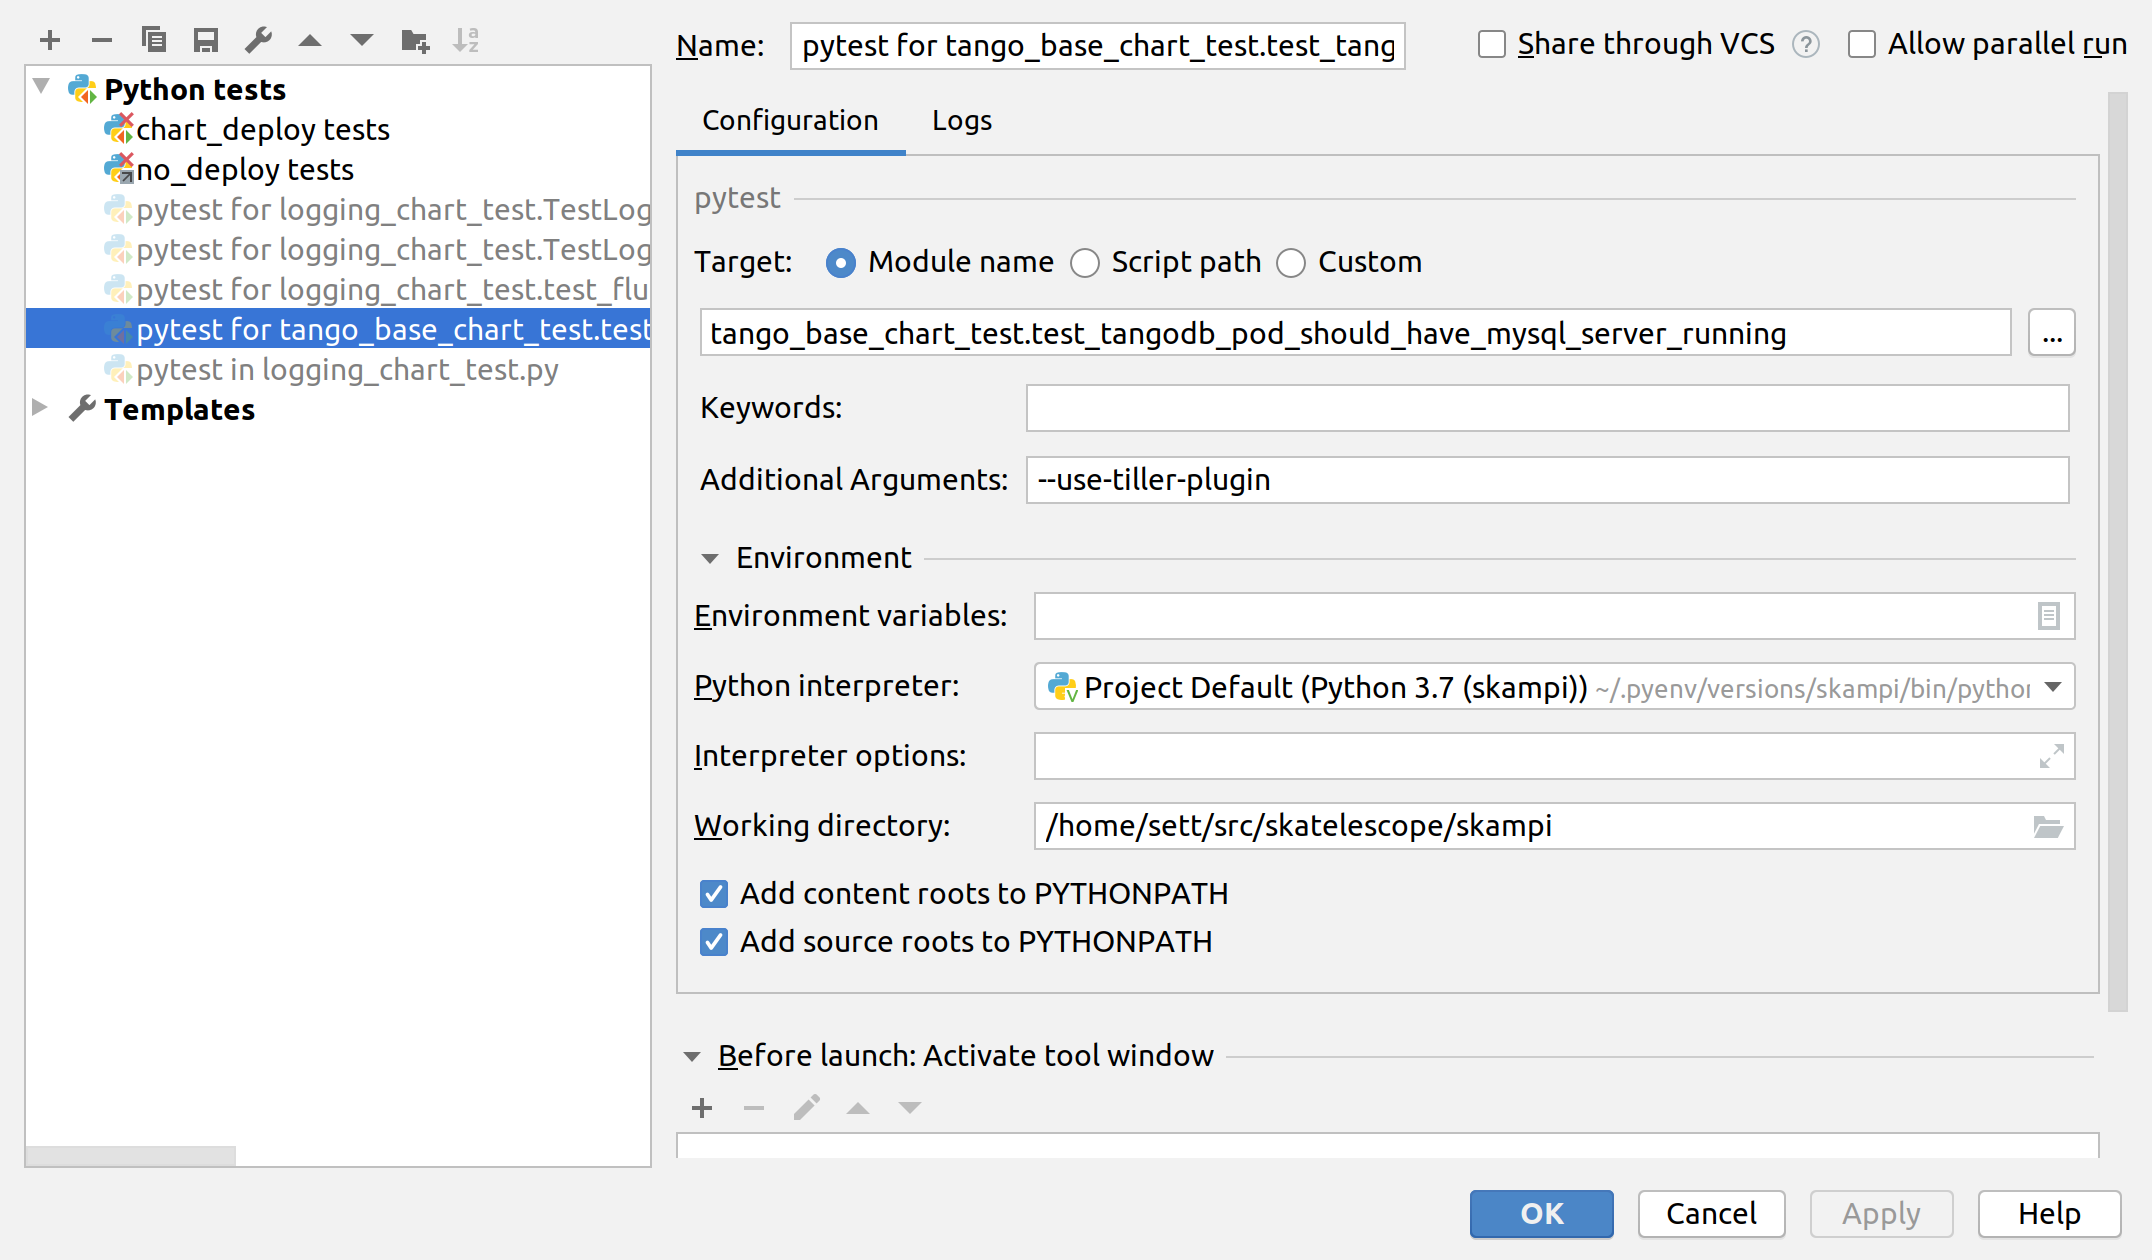
PyCharm integration
PyCharm as an IDE can be used to run and debug the tests, just be sure to edit the Run/Debug configuration so that it has the appropriate “Additional Arguments” and “Working Directory” (SKAMPI root directory and not /tests).
Third-party libraries
The following third-party libraries are included in the test-requirements.txt and used by the tests and various supporting testware components:
- python kubernetes client is the official kubernetes API client for
Python. It’s provided as a pytest fixture,
k8s_apiand also used byChartDeploymentto obtain a list of deployed pods(see get_pods method). - testinfra is a library that allows connecting to pods and asserting on the state of various things inside them such as open ports, directory structure, user accounts, etc.
- elasticsearch-py is the official, low-level Python client for ElasticSearch.
- requests is the popular HTTP client library.
| [unit] | (1, 2) A unit in this context is a Helm chart that can be deployed and tested. |